


Ask Question
If you are
tracking your car, running thinner oil, or adding forced induction, a larger
PCV catch can might be desirable. We
have spent a great deal of time integrating the Radium Competition VTE Catch
can into the IS-F application. The VTE (vent to engine) can
is specifically designed for returning clean air back into the intake. We have made this as seamless as possible,
with an integrated mount, transitions fittings, washer reservoir relocation,
and a petcock drain that routes down to the oil filter housing area for easy
access. We also increased the return
hose diameter to 5/8" to reduce the air velocity and promote further
separation of finely atomized fluids in the return path. The hose diameter and
locations also promote a drain-back function to the can.
Features:
- Radium Engineering Competition VTE .625qt Catch Can (L) with drain and dipstick.
- 3/8" PCV hose from crankcase and 5/8" intake return hose with step-up transition to OE intake hose diameter.
- All hoses are Fuel/Oil PCV-rated hoses to resist sweating and provide stable airflow conditions.
- Laser-cut stainless steel mounting plate and washer reservoir fill relocation.
- All clamps to intercept the stock PCV hose and clamp to the intake are included.
- -10 ORB fittings to the catch can included.
- Right angle ORB and 1/4" hose drain petcock included. Route to Oil filter door on front underplate.
- 2 hose separators included, one with a mount to the grounding point on the front of the engine to position hoses properly.
- OPTIONAL: Lowering the kit to drop the catch can low enough to clear engine plastic covers. This add-on adds 3 riser spacers and one shim for the body mount. The 2-hole riser will go where the Washer reservoir relocates. You will not be able to fill the washer reservoir with this kit without removing the side cover for access. Note due to some fastener interference, slight trimming may still be necessary, but it will be minimal.
Installation:
- NOTE: MODIFICATIONS TO THE PCV/ INDUCTION SYSTEM CAN CAUSE DAMAGE IF DONE IMPROPERLY. ALWAYS INSPECT THE SYSTEM FOR VACUUM LEAKS, AND PURGE LINES WITH COMPRESSED AIR TO REMOVE LOOSE DEBRIS THAT MAY HAVE ENTERED DURING ASSEMBLY OR SHIPPING. IF THE VEHICLE IDLES IRRATICALLY, STOP IMMEDIATELY AND CHECK ALL CONNECTIONS. FIGS CANNOT BE HELD RESPONSIBLE FOR IMPROPER INSTALLATION, AIR LEAKS, OR DEBRIS ENTERING YOUR ENGINE. BY INSTALLING THIS PRODUCT, YOU ACKNOWLEDGE THESE RISKS AND TAKE THEM SOLEY UPON YOURSELF AND YOUR EQUIPMENT.
- Tools required: metric hex set, 10mm socket, hose cutters, and hose clamp pliers.
- -10AN wrench required for 5/8" Push-Loc hose connections. -6 swivel banjo requires a 4mm hex and -4 ORB connection for the drain.
- You will need to remove the engine cover and side covers for easier access and the breather hose off the driver's side bank of the intake elbow. The side cover will need to be trimmed to use with this solution.
- Remove the ECU cover screw and the washer reservoir screw. Both 10mm
- Remove the harness standoff clip just above the driver's side headlight, this will allow some wiggle room on tightening the 5/8" return hose.
- Attach the mounting plate to catch can if not already installed. The holes will be at the end of the slots with the can exit approx. 60 degrees pointed toward the front. See images for reference. Install the 2 screws for the reservoir relocation bracket after the can is installed so that it can slip under the reservoir mounting tab.
- Install the drain: Remove the drain plug from the catch can (4mm hex) and install the 90-degree ORB to 1/4" hose barb adapter. Clock toward the engine, and set the ORB compression nut so that the O-ring is compressed.
- Cut 66" of 1/4" hose from the provided 6ft, or in other words cut 6" off. Slide hose onto barb and route hose on the lower section of the ECU case toward the radiator. The hose will route down by the AC hose line and then under the area where the oil cooler/oil filter housing sit. Zip tie hose to adjacent hoses where possible to keep it away from the cooling fans.
- Remove the 4x M10 screws that hold the oil filter access panel on. Remove the panel and feed the hose into this area. Install the petcock drain valve and make sure it is in the closed (90 degree) position relative to the hose.
- Install the 6" hose section to the end of the drain valve and constrain with zip ties. This will be the access point to drain the catch can when full.
- Install the -10ORB AN fitting to the catch can exit (side hole). Torque until O-ring compresses, excessive torque is not required.
- Set the catch can in place, note it will be a very tight fit and will only fit in one position. Verify the fittings have enough clearance, especially the return hose. Install the last relocation bracket by slipping in underneath the tab and fastening to the tank via the 2x M5 button head screws. Torque to flush. Install M6 socket cap screw for the reservoir filler, 5mm hex key. Torque snug.
- Install the provided longer ECU cover base screw and the reservoir M6 screw to mount the catch can bracket to the vehicle. Tighten just to snug as both threaded fittings are light duty.
- Install the right angle swivel barb ORB fitting on the top ORB fitting location. Tighten the top hex screw (4mm) until O-ring compresses and seals.
- PCV-Intercept:
- To install the AOS Catch Can (AOSCC) hoses, you will need to cut the factory PCV hose and use the provided 90 degree barb fitting and constant tension clamp on the AOSCC input.
- The intake hose uses a short section of oversized hose that transitions to the 5/8" hose via our FIGS transition barb adapter.
- The hoses are pre crimped with band clamps so the only thing you will need to do is route them properly and to use the new constant tension clamp provided.
- All constant tension clamps can be difficult to line up with conventional pliers or needle-nose pliers, so a specialty hose clamp plier set is strongly suggested. These can be purchased cost effectively at most retail tools supply houses and online.
- The 3/8" hose will route underneath the cable harness that crosses the front of the engine by the intake.
- The 5/8" hose will route under the breather but on top of the harness that the 3/8" hose routed.
- The line separator mount will mount under the M10 ground screw that is attached just under the cable harness bracket above the cam cover. Remove the screw and release the clamp for more space.
- Install the small stainless bracket with the short tab up, use this mounting hole and reinstall the ground screw with the long section of the bracket aimed forward and slightly up.
- Leave hose separator off for now as free movement of the hose will help the installation.
- Routing the 5/8" hose, pass underneath the front radiator fan harness such that it bends naturally into the ORB Barb fitting on the AOSCC.
- Work the 5/8 hose onto the barb nipple and facted the retention clamp on just over the barb portion.
- Install the right-angle barb fitting into the factory PCV hose, with the constant tension clamp first. Slip back the insulation to help with the process and slide the clamp over the barb.
- Route the 3/8" hose over to the barb swivel ORB keeping it above the harness the 5/8" hose is routed under. Attach the clamp over the hose and slide over the fitting. Then the clamp over the barb.
- Slide the oversized hose and clamp over the intake nipple. It’s a tight clearance fit so those hose clamp pliers or a set of long-reach pliers might be required.
- Install the hose separation mount by sliding the printed mount over the tab and then fixing in place with the plastic rivet provided.
- Snap the hoses into the separator and bend the tab upward to keep it from pressing on the upper radiator hose.
- Snap the second hose separator toward the AOSCC where it makes sense, wherever the hoses will fit tightly together without adding strain.
- Reinstall the harness clip on the cam cover.
- Reinstall the engine cover and adjust any hoses that interfere.
- Once everything is installed, check for vacuum leaks. You may start the vehicle and check or indications of higher idle, spray connections with carb cleaner, and listen for changes in engine RPMs. Verify catch can dipstick is tightened, and the O-ring is lightly compressed.
- PLEASE NOTE: if you want to run the side engine cover, it will need to be trimmed both around the fitting and to expose a new window to fill the washer fluid.
Maintenance:
- The AOSCC should not require any specific maintenance. The dipstick is easily unthreaded to check fluid level and the drain should be utilized as required. Just make sure you remember to close the valve after draining.
We always want to hear from you. If you have suggestions on how to improve these instructions, the installation process, or show off pictures of your installation, email us or tag us on social media so we can reshare.
This product is intended for OFFROAD USE ONLY. The customer assumes all liability for the installation and inspection of the system continuously. If there are any questions you can always contact us for assistance. By purchasing this item you agree to these conditions and our general conditions and terms.
Radium Catch Can Features:
Radium Competition Catch Cans (CCC) meet the common 1 quart minimum capacity requirements dictated by many organizing bodies including SCCA, NASA, and Formula Drift. This VTE (vent to engine) competition catch can is specifically made to recirculate clean air back into the intake. For a competition catch can that vents to atmosphere (VTA).
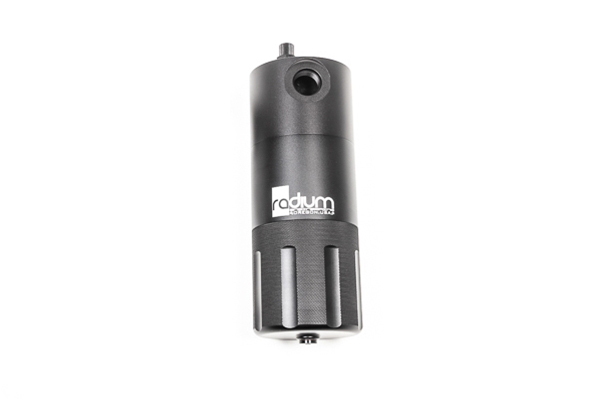
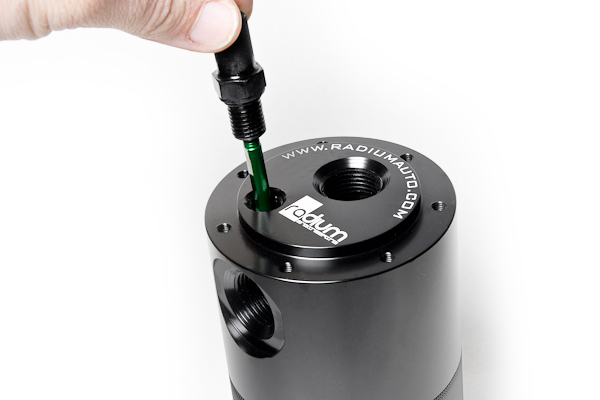
Like all Radium catch cans, the CCC has an easily accessed dipstick to quickly check fluid level. A threaded 4AN ORB port is integrated on the bottom for the ability to plumb a petcock drain valve.
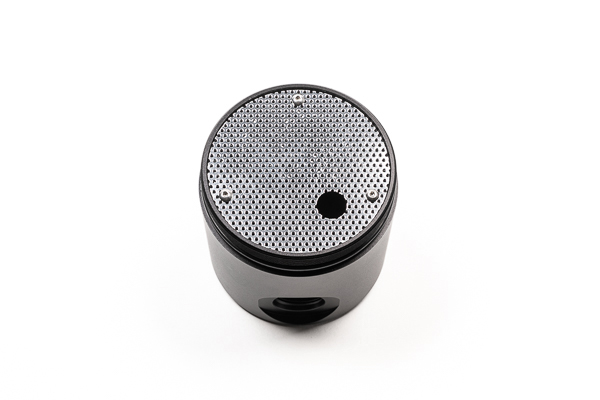
The combination of the baffle (above) and stainless steel filtration media (below) provides surface area for oil vapor to condense and drop out of suspension. The VTE CCC has 125.2% more filtration than the standard catch can. The media does not create any flow restriction and can be removed for cleaning.
| Lexus | IS F | 2008-2014 |
FIGS/ RADIUM ENGINEERING COMPETITION AOS CATCH CAN KIT FOR THE IS-F 2008-2014
- Brand: FIGS Engineering
- Product Code: L1360
- Availability: In Stock
-
$572.25
Available Options
Related Products
")
FIGS IS-F SIDE MOUNTED OIL COOLER (FOG LIGHT DUCTED)
Don't stop lapping from oil heat issues, stay on track longer!After many years of testing, we are re..
$937.13 $1,074.94

FIGS IS-F TRACK COOLING PACK
A serious package for serious IS-F track goers, this kit will resolve your cooling issues on a dedic..
$1,542.40 $1,653.75

FIGS IS-F SOLID NYLON STEERING RACK BUSHINGS
Replace your worn bushings and upgrade to a higher performance option.Specs:-Carbon-fiber reinforced..
$159.86 $181.91

GR SUPRA 3.0L TURBO RADIATOR
Koyorad's new 48mm “HH” Series radiator core features an ultra high fin density to maximize heat tra..
$500.00

RADIUM ENGINEERING GR SUPRA DUAL CATCH CAN KIT
Radium Engineering catch cans feature large 10AN ORB ports, a 4AN ORB drain port, 2-step oil separat..
$509.95

RADIUM ENGINEERING TOYOTA TUNDRA PCV CATCH CAN KIT 2007-2021
This installation kit was specifically designed for the 2007-2021 Toyota Tundra with the 3UR-FE engi..
$264.95

FIGS IS-F COMPETITION COOLING PACK
A serious package for serious IS-F track goers, this kit will resolve your cooling issues on a dedic..
$2,205.00 $2,466.19
Tags: AOS, separator, isf, is-f, pcv, oil, catch, can2008, 2009, 2010, 2011, 2012, 2013, 2014, 09, 08, 10, 11, 12, 13, 14, competition, l1360, blowby, boosted, supercharged, supercharger, air, oil, blow, by, blow-by, air, oil, seperator
